
The three basic concepts are:
Let us first give a brief sketch of each one.
When one or more people invest time and recources to achieve a certain goal, we often call that a project. In our context here, we only focus on digital projects, i.e. enterprises that aim at a digital product, comprised of one or more files.
For example:
In all these cases, a project is an ongoing process involving one or more files in a meaningful combination.
In the sequel, we develop a more precise definition by saying that:
Each project has
- a home directory, containing all its files,
- a project description, including a unique project identifier or PID, and
- an arbitrary number of backups, i.e. stored copies of the home directory at a certain time.
Every project has a home directory, which is a dedicated folder in the file system of your machine that holds all project content. All files (and subfolders) under this home directory belong to the project, and all files outside this folder do not.
Every project has a project description, which is a (usually small) record like this one:
f31e77d8c15b3e4f2477f48e4ab9877773dfebde, is a numeral, made of 40 hexadecimal digits (i.e. 0, 1, ..., 9, a, ..., f).The creator and the date of birth together determine the actual PID for the project, which is automatically generated. Assuming that no person creates two projects at the same time, this PID is so unique, that no any two projects in the whole world and whole history will ever have the same PID.
The title, the info, the tags and location can be changed and updated at any time without changing the project itself.
A project is essentially a process through a longer period of time. During that time, the project may change, and not every change may turn out to be a progress. Some projects go through various versions and sometimes, explicit version titles or numbers are attached to these different states. Sometimes, it is important and useful when an earlier project state can fully be recoverd. For this purpose, each project may also comprise an arbitrary number of backups, where each one is a full stored copy of the home directory at backup time.
This handbook itself is edited as a project in a Project House and this is how it currently looks in the browser (when the Caretaker GUI server is running):
![]()
The grey area displays the content of the active home directory with its subfolders and files. The red/green/yellow color of some files indicate that the according file is modified/new/deleted compared to the last backup.
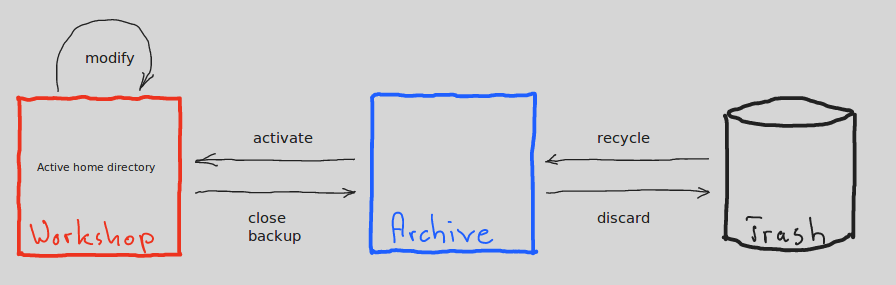
A Project House is a special system for the storage and management of projects.
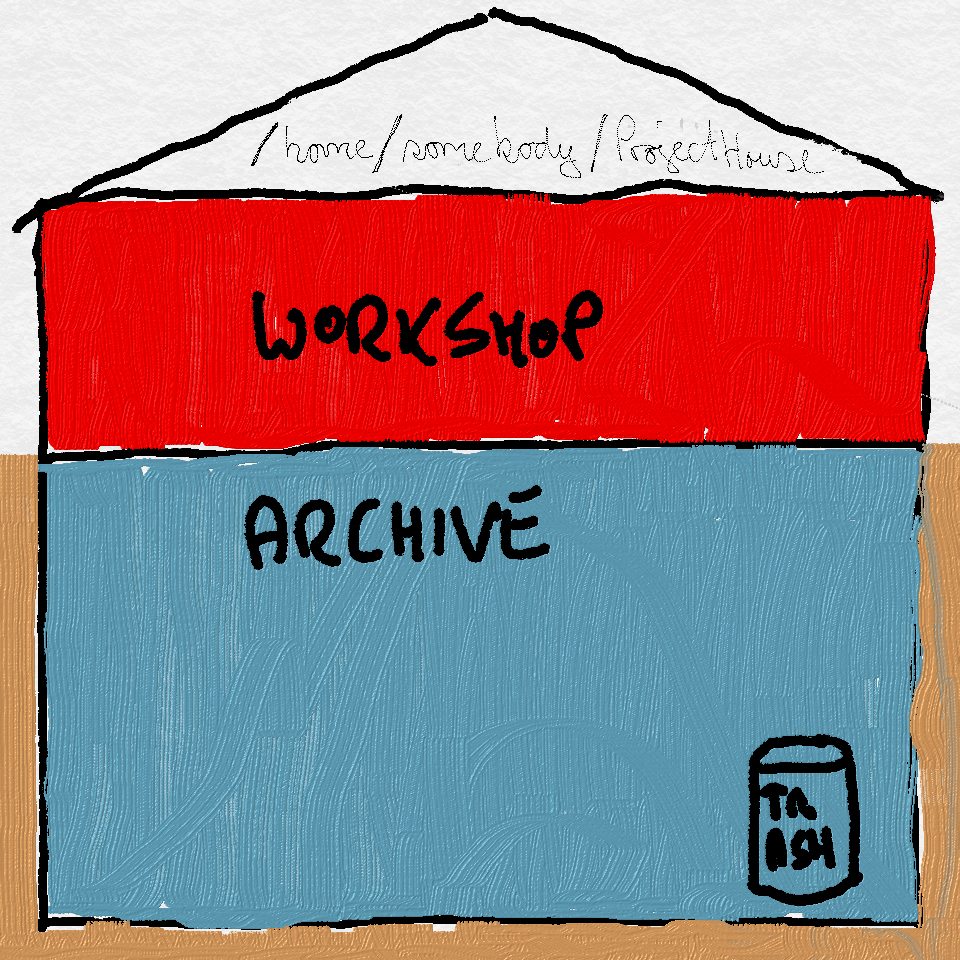
Each Project House has
- a root, which is the file path to the place it exists on the computer,
- an archive, where all the projects are stored, and
- a workshop, where all the active projects are edited.
Each Project House has a dedicated place somewhere on your computer: a folder, which is always called ProjectHouse. The path to this folder is the so-called root of the given Project House.
On a UNIX-like system (including Linux or Max OS X), such a root is e.g.
/home/somebody/ProjectHouse/and on Windows, this is e.g. something like
C:\Users\somebody\ProjectHouse\There can be multiple Project Houses on one computer, each one with a different root and thus at a different place of the file hierarchy.
The archive of a Project House is the place where all projects are stored. There is an internal order and user-defined categorization, so that bigger archives can be structured in a custom and flexible manner.
All projects in the archive are protected and only their description can be changed. For example, you can change the title or info text of a project. But you cannot modify the project content, i.e. the files and subfolders under its home directory. In fact, a project in the archive does not even have a visible home directory, because that is protected and stored away, as well. (Actually, the whole archive and storage system of a Project House indeed exists in a hidden folder called .basement directly under the root.)
In order to make progress and changes to a project, you have to activate it, first. Only an active project has a visible and accessible home directory.
The Workshop is the place of all active projects and their home directories. And this place is not arbitrary in a Project House. Instead, each active home directory of a project is placed directly under the root. And the name of each home directory is not arbitrary, either. The name of the active home directory of a project is its PID.
For example, if there are three active projects:
then there are three active home directories under the root:

and each name is the PID of the according active project.
(Actually, there is always one additional, but hidden folder under the root, namely the .basement, containing the whole archive.)
And in these home directories, we can now modify and develop our active projects.
This whole design may look strange at first. Later on, when we saw some living examples and the whole workflow, we will see that it makes a lot of sense.
Caretaker is an application that creates and maintains Project Houses and their projects.
The Caretaker application
caretaker commandCurrently, the application exists as a command called caretaker, and it is called from the command line (Linux shell, Mac OS Terminal or Windows Command Prompt).
In future implementations this might be complemented by a graphical interface for the many users that are not used to this kind of command input. But for now, this is what we have.
So, for example, when you first create a Project House, you need to call
caretaker init-house ...and when you like to use the graphical user interface (GUI), call
caretaker start-server ...as all explained below in more detail.
The main functionality of this application is a server that provides a graphical user interface (GUI), which runs inside a browser (say Firefox, Chrome, Opera) and enables the creation and management of all your projects by interacting with its browser window.
After starting the server for this browser GUI (with the caretaker start-server ... command, as further explained below), you can open the start page of the GUI:
![]()
The white path (here /home/buc/tmp/ProjectHouse) is the root of this particular Project House, the folder under which all projects are stored and maintained.
This is how a typical project is displayed:
(We use a blue or "cold" background for an inactive project like this one and a red or "hot" background for active projects.)
This is a look at an archive:
(The archive is always on a blue background.)
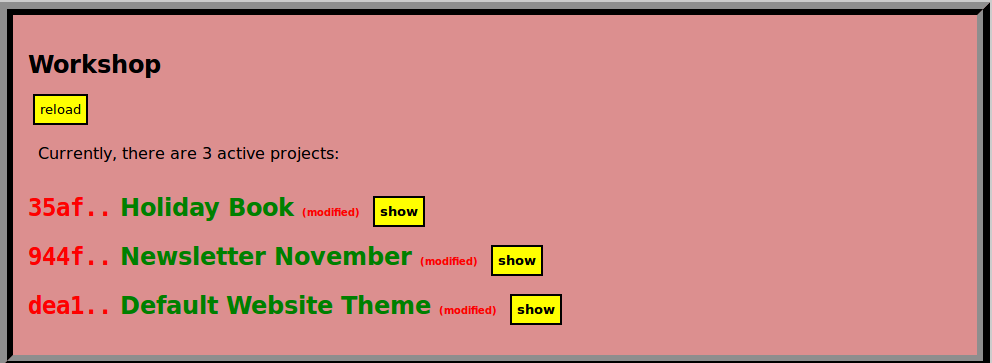
And this is an example workshop:

(The workshop is always on a red background.)
In future versions, this part should become easier, too, and be replaced by standard desktop programs. But for now, we need to follow these instructions, here:
Caretaker is a JavaScript script that runs on the Node.js platform. So it is mandatory to install Node.js, first, as is explained on its home page.
The second step is the installation of the caretaker program, which is done by
npm install -g caretaker-in-a-project-houseYou probably need administrator/root privileges to run this command.
When everything went well, try
caretaker helpor
caretaker versionto check if everything is working well.
Choose a directory in which you create a new Project House, e.g. /path/to/some/folder/, then run
caretaker init-house --dir=/path/to/some/folder/then a new Project House is created with the root
/path/to/some/folder/ProjectHouseNow start the server with
caretaker start-server --root=/path/to/some/folder/ProjectHouseand then open a browser and go to
http://localhost:55555/?do=homeThere, you should see the home page of the Caretaker GUI for this specified Project House.
You can terminate the server at any time with the key combination Ctrl+C.
We now explain, how projects can be created and modified. We understand the workflow in a Project House and how this is supported by the Caretaker.
In the sequel, we assume that a Project House is created and the GUI server is started on its root.
By choosing the new button from the menu, we are provided with a form to fill in the description for a new project.

Mandatory values are the title and creator. The entries for tags and location are useful for the categorization of projects in the archive. For now, we just leave them empty.
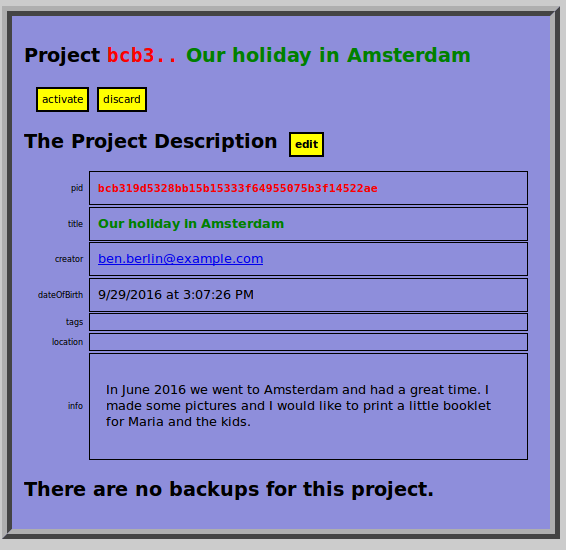
When the form is submitted, the project with an automatically generated PID (bcb3..) is displayed:
There are no files and content, yet, and no backups, either.
There are three buttons available to further modify the project:
returns to the editor form and allows to modify the project descriptor
throws the project into the trash
takes the project from the archive into the workshop.
A newly created project is inactive, by default, which means, that it only exists in the archive. When we it, the project is taken into the workshop (also indicated by the red color):

This means, that its active home directory is (re-)created, which is defined as root+pid, i.e. the PID is the name for the directory which is located directly under the Project House root. In our example, this is active home directory is
/home/buc/tmp/ProjectHouse/bcb319d5328bb15b15333f64955075b3f14522ae/An active project can now be modified. We can work with it like we a used to do with all other files and directories. Let us first add a new HTML file OurHoliday.html and three JPEG files in a separate subfolder called pics.
When we then the page, we can see the content of the active home directory has been changed accordingly.

The new items are displayed in green in the overview of the home directory.

We say, that the project is modified.
When we are satisfied with the status of the project, we can create a . This points us to a form where we are asked to provide a title or comment for this specific backup:

After pressing create backup, the backup is a fact and appears on the bottom of the project page:

Suppose, we edit the project even further, i.e. we change the content of the active home directory. At any time, the current status of the project is visualized as a colored tree in the active project page (at least after a ):
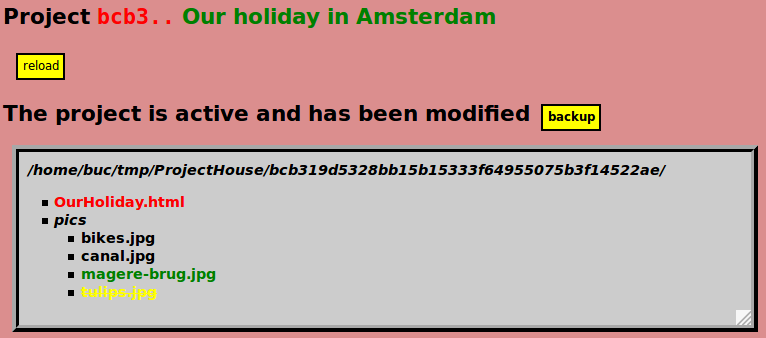
We can see that we have made the following changes after the last backup:
OurHoliday.html has been modified (indicated by a red color)magere-brug.jpg is a new file (colored green)tulips.jpg is deleted (yellow and stroke through)pics, bikes.jpg and canal.jpg) is black and thus unchanged.This color scheme in tree displays of active home directories is an important, so let us summarize:
If we now make another , all the project status changes from modified to not modified and all tree content becomes black

Now that we have backed-up the latest changes, our project can be closed by means of the button. This means that the active home directory
/home/buc/tmp/ProjectHouse/bcb319d5328bb15b15333f64955075b3f14522aeand all its content is removed, again. The project page changes its background color from red (active, workshop) to blue (inactive, archive), again.

The project, together with its two backups, is now stored in the archive.
At any time, the inactive project can be activated, again, which means that the last backup is restored under the active home directory.
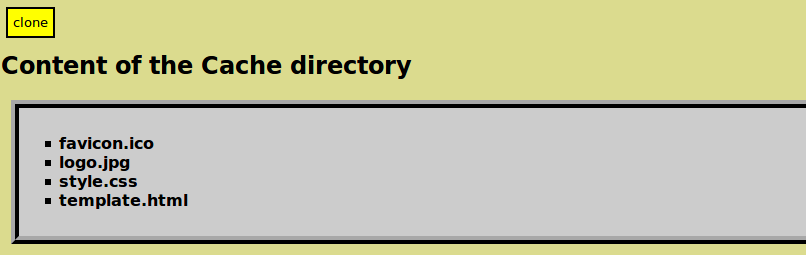
But it is also possible to any other of the backups. If we the first backup, it is reconstructed in the cache:

The cache displays the project and backup information, and the cache directory contains a reconstuction of the active home directory at backup time.
If we wish to, we can this backup from the cache.

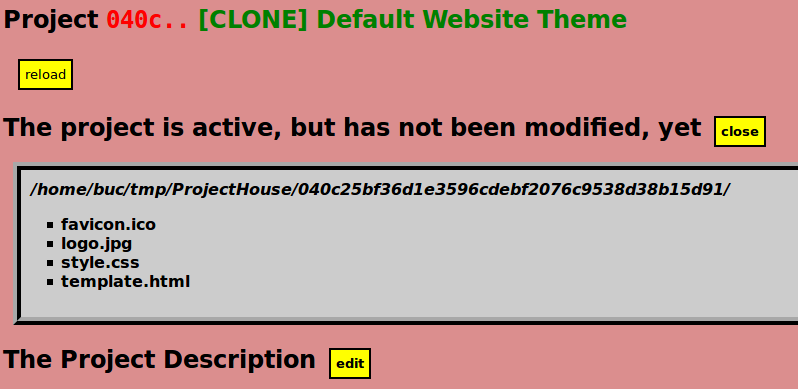
A new project is created, with the same content as the backup. It has a new PID d8f1.. and the title is the old title, preceded by a "[CLONE]".
We can the description to our liking and the project to work with it. Next to the original project we now also have a cloned version, and both projects can be modified independently.
At any time, we can also decide to the project. We are then asked to confirm the action

and if we actually do want to it, this choice is performed and we get a confirmation message:

An if you regret this move later on, just have a look into the trash, where all discarded projects are gathered.

There you can choose to the project, wich moves it back into the archive.
The archive is the place where all your projects reside.
The archive can be accessed at any time via the archive button in the menu bar. It can only be accessed via the browser when then caretaker server is running.
Each project has a description and an arbitrary amount of backups. The description can be edited at any time. Two optional fields in any project description are the location and the tags, imposing an order and categorization, as we will explain.
The archive button brings you to the archive page, an overview of all the projects in your Project House.
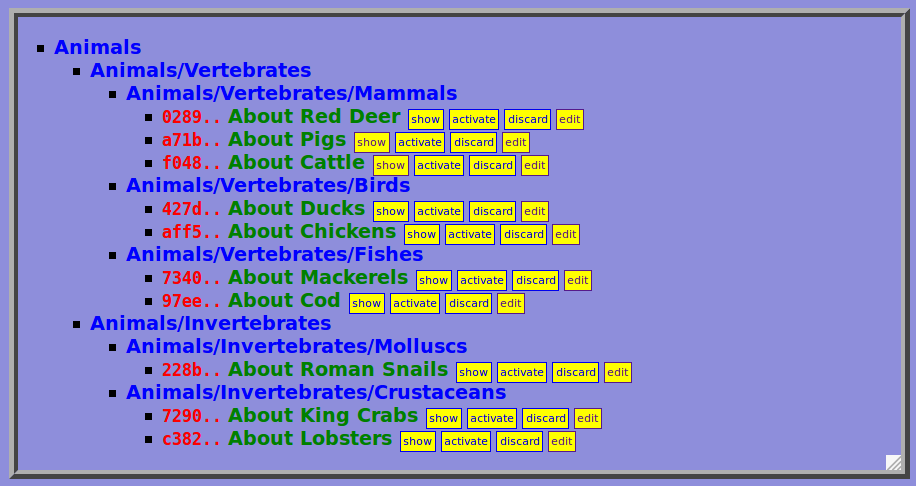
Suppose, you created ten illustrated articles about animals consumed in French cuisine and the overview in the archive looks like this:

Over time, the number of project in you Project House is growing, and a linear list is not the best way anymore to keep an overview. We therefore provide an hierarchical and a categorical order principle for your projects: locations and tags, respectively.
When you any of the projects, you can also edit the location of the project, which is for the project in the archive. For example, if you adopt the biological classification, the location for the lobster article would be

and after changing the project description, the project tree overview of the archive is

And editing the locations of the other nine projects accordingly gives us
The location is an order similar to the order of files by means of directories. But it exists only in the archive as a table of contents for all projects.
You can also add any amount of tags to each project. For example, you could the chickens article and add two tags:

Suppose you add more tags to more of the projects, then the tag index in the archive may look like

i.e. there are six tags: "Meat" is a tag in 3 projects, "Main course" is a tag in 8 projects etc.
And if you choose to view the , the according three projects are displayed:

The workshop button brings you to an overview of all currently active projects of your Project House.
When and only when a project is active, you can create, modify and delete its files and directories and run programs on it. An active project in the workshopw interacts with the operating system, because all its content is available in the active home directory of the projects, which is given by the formula
active home directory = root + PIDSo in a file manager, the workshop is given by the directories under the Project House Root:

In each of these three directories, all the content of each of the three projects exists.
And again, you can modify this content under the active home directory, then make a and the active project, again. The then moves back to the archive and its active home directory disappears.
In the main operating system, hidden files and directories begin with a dot. In most file managers, hidden files are not displayed by default, but there is an option in their settings that changes this behavior. And when we choose to show hidden items, we can see that every Project House root has a hidden .basement directory

In the basement, the archive (under projects), the trash (under projects.trash), the cache and the storage of all files are located. You should leave this hidden basement hidden and untouched and never mess with its content. Better leave that to the caretaker program.
Although the storage of projects and backups works efficiently under the hood, it is helpful to understand a little bit how it works.
The so-called SHA-1 (Secure Hash Algorithm 1) is a function, that computes a number for every file. A number, which is represented by a hexadecimal numeral of 40 digits.
On every Linux system, this function is pre-installed and called sha1sum. If you have say an active project with a file OurHoliday.html, then

So the SHA-1 number for this file is aece47ee6cea9448c14b4d8755aaf5b3313ec612.
This SHA-1 function was originally designed as a cryptographic tool, and as such it is outdated and replaced by better versions, such as SHA-2 or SHA-3 (see the wikipedia entry for more information). But it is still used in software systems like Git or our Caretaker, because it has a couple of useful features:
The algorithm is very fast. On average hardware and files, the result is computed in fractions of a second.
The result is relatively small, namely a number or string of only 40 digits. And that makes it very suitable as an address in a storage system. The content of our previous example file OurHoliday.html is stored under the address aece47ee6cea9448c14b4d8755aaf5b3313ec612.
The function is quasi-unique in the sense, that we may safely assume that the SHA-1 number of two files with different content is also different. 1
As a consequence of its features, the SHA-1 function provides us with a 1-1 assignment between all of our files and hexadecimal numerals. If we make a backup of a project, we save each file not under its own name, but under its hexadecimal number.
The backup of an entire active home directory uses the same idea, but requires more steps.
If we consider our initial example project, when we created a backup of this active home directory

then this active home directory with four files is converted into a so-called JSON object
{ "OurHoliday.html" : "aece47ee6cea9448c14b4d8755aaf5b3313ec612",
  "pics":
    { "bikes.jpg"  : "6318f66a7b10033e759362e1a52068bff4ae6127",
      "canal.jpg"  : "1c9625aabece59b2dfacf6872727bef32510e13f",
      "tulips.jpg" : "e8a94988d4c4041c60443d929c4a0dd5b6e38af5" } }
Each of the four files has a number assigned, and under this number its content is stored. And then, we compute the SHA-1 number of the JSON object itself and store this as well. So in the end, we have put the whole backup under one address in our store. And when we recover or clone the project or backup, we perform the same steps in reverse order.
And, as jou might have guessed by now, not only each backup of a project is a JSON object, but also the whole project itself.
And indeed, the PID of every project is also a SHA-1 number result: We take the JSON object, given by the users email and time of creation
{ "creator"    : "ben.berlin@example.com",
  "dateOfBirth : "dateOfBirth":"2016-10-17T23:40:37.010Z" }
and the SHA-1 number of this JSON object is what makes the PID of a project.
That alltogether means, that no two projects have the same PID, even if the projects are housed in different project houses on different machines.
So we have a safe storage system and every project has a unique PID.
But still, why do we apply this SHA-1 function and all these number encodings at all? If we would like to make a backup of an active home directory, we could just copy this directory along with all its sub-directories and files into our storage.
The point is, that this simple backup strategy blows up the storage space!
Each time we make a backup, we double that space. When a project only has minor changes in its last ten backups, the storage space is about the tenfold of its current size.
But an implication of our SHA-1 encoded storage, each file content is only stored once!
So, ten backups with many similarities do not require much more storage space than just one backup!
In other words, due to this encoding, our storage system is pretty irredundant. There is no real trade-off between the safety of a frequent backup and the required storage space.
You don't need to be afraid of exceeding the storage when you decide to make a backup or clone a project!
caretaker commandThe current version, the Caretaker program is a command that is to be called from the command line (Linux shell, Windows console or Mac OS Terminal. Most of the time, you will only start the Caretaker GUI server

and then leave the command line and work in the browser with the GUI, i.e. the graphical user interface.
Maybe, we will replace this command by a GUI or app itself in future Caretaker versions. That would make everything more familiar for average users, which may never have to work with the command line. But in its current version, the caretaker command is a command and it does also have some other options than just starting the GUI server.
In this section we introduce these advanced functions along with some advice for the more serious Project House user.
caretaker command and helpThe basic syntax of each call is this
caretaker COMMAND OPTION_1 OPTION_2 ....i.e. the word caretaker followed by the command and a number of zero or more options.
Every option follows a standard form on UNIX-like systems
--key=VALUEi.e. two hyphens (--) followed by a key word, an equal sign (=), and a value. There must be no spaces between these elements.
A well-formed example is the start of the GUI server on a Project House
caretaker start-server --root=/home/bobby/homework/ProjectHouse --port=54321which has start-server as its command and two options
root with value /home/bobby/homework/ProjecHouse, andport with value 54321For all calls, the order of the options is arbitrary. For example,
caretaker start-server --root=/home/bobby/homework/ProjectHouse --port=54321and
caretaker start-server --port=54321 --root=/home/bobby/homework/ProjectHouseboth have the same effect.
help commandThe help command, i.e. a call of
caretaker helpreturns an overview of all commands and options:
SYNTAX:
caretaker help
  returns this help message.
caretaker version
  returns the version number.
caretaker init-house --dir=DIR
  creates a Project House with root DIR/ProjectHouse under the given directory DIR
caretaker start-server --root=ROOT --port=PORT
  starts the GUI server for the project house ROOT (e.g. --root=/path/to/my/ProjectHouse).
  The PORT (default is 55555) is the port number for the URL of the GUI server, i.e.
  the URL for the home page is then `http://localhost:55555/?do=home`.
  The `root` option is optional and defaults to `./ProjectHouse` when it is omitted.
  The `port` option is optional, too, and defaults to `55555` (i.e. 5 times 5).
caretaker empty-trash --root=ROOT
  empties the trash in the Project House ROOT.
caretaker import-house --root=ROOT --import=ROOT
  inserts the content of the import ROOT into the given Project House ROOT.
  The `root` option is optional and defaults to `./ProjectHouse` when it is omitted.
caretaker export --root=ROOT --pid=PID --dir=DIR
  writes the project with the according PID to the specified directory.
caretaker export --root=ROOT --tag=STRING --dir=DIR
  writes all projects with the specified tag to the specified directory.
caretaker export --root=ROOT --creator=EMAIL --dir=DIR
  writes all projects created by the specified creator to the specified directory.
caretaker export-all --root=ROOT --dir=DIR
  writes all projects to the specified directory.
See http://bucephalus.org/Caretaker for more information.
In the sequel, we explain these commands and give some advice for good practice.
A Project House root is any directory named /f_1/f_2/.../f_n/ProjectHouse in UNIX-like systems or something like f_1\f_2\...\f_n\ProjectHouse on a Windows machine, hosting the structure of a Project House, i.e. a .basement directory containing the storage, project description files, the cache and trash. The /f_1/f_2/.../f_n/ (or f_1\f_2\...\f_n\) part is the parent directory of this Project House root.
Now, to create such a Project House root and the whole according stucture underneath, call
caretaker init-house --dir=DIRwhere DIR is the parent directory under which you would like the new Project House to exist.2
For example, on a Linux machine you could create a Project House with root /home/robert/Documents/ProjectHouse by calling
caretaker init-house --dir=/home/robert/Documents/ProjectHouseNote, that you can create more than one Project House on your machine. You can even import a Project House into another one, as we will see below.
If you have an existing Project House on your machine and its root is say /home/robert/Documents/ProjectHouse (or C:\Users\robers\Documents\ProjectHouse on Windows), then you can start the Caretaker GUI server by calling
caretaker start-server --root=/home/robert/Documents/ProjectHouse --port=55555or, on Windows,
caretaker start-server --root=C:\Users\robers\Documents\ProjectHouse --port=55555You can also omit the port option, because 55555 is the default port value, anyway.
After a successful start, you see a response like
Server started listening on port `55555` ...
The Cartaker GUI Server for the Project House at `/home/robert/Documents/ProjectHouse/` is running now.
Direct your browser to `localhost:55555/?do=home` to get started.
Use `Ctrl + C` to stop the server from running.
Thus, if you open your browser and point it to the URL
http://localhost:55555/?do=homeyou will see the home page of the Caretaker GUI.
The localhost domain indicates that the server is running on your own machine.
The port number, here 55555 after a domain name and a colon (:) is part of every URL. If you omit it, it always defaults to port 80, which is standard for the transfer protocol of the World Wide Web.
You can also choose another port, say 54321. That enables you to simultaneously run multiple Cartaker servers under different ports.
The query part ?do=home of the URL is mandatory for the start page of the Cartaker GUI.3
If you become a frequent user of the caretaker GUI server, you might want to create a bookmark in your browser for this URL, of even configure that to be the default start page.
When the server is running, you will notice that your command does not terminate, i.e. you cannot really call another command.4 This makes sense, of course, because the server is supposed to keep running. You can terminate it at any time, however, with the key combination
Ctrl + CWe already saw that we can make a of an active projects, which saves the entire state of its active home directory. We also explained that the irredundancy of the storage system makes these backups very cheap. But that does not necessarily mean that you should make frequent project backups. They only really make sense when your project is in proper state. For example, when it is a complex computer program and everything does seem to work somehow and it makes sense to label the whole as a new version.
If you want all of your precious and unique work in your Project House to be safe from loss, you should adapt another routine: copy the Project House root and all its content from your say main computer disk onto another medium, for example a DVD! And do that in a regular fashion, say every week on a fixed day!
Or you use some kind of backup tool to mirror the Project House content, so that each time you make a change, the change is saved on the second medium, too.
In the unlucky event of a breakdown or computer loss, you can then recover the whole Project House simply by copying it back.
It is no problem to copy or move a Project House root around and then start the Caretaker GUI server for the new location and work on your projects, again. But a Project House, at least the archive with its internal storage, requires the Caretaker program to be accessible, at all.
But suppose, you would like one, serveral, or all projects with their backups in a static form that is independent from this program. This can be doen by what we call an export.
Suppose, your archive contains an active project with PID 72f89bcf0edcb2e3b69274d69d62b930e8aa6c64 and three backups. And let's say you would like to export that to /home/path/of/another/place/. Calling
caretaker export --root=/home/path/to/my/ProjectHouse --pid=72f8 --dir=/home/path/of/another/placedoes just that.
Note, that a PID has 40 characters. But each time a PID is required, it suffices to specify only that many characters, that make the PID uniquely identifiable among all the current ones. In our case, we only named four characters --pid=72f8 and it turned out to be enough. Otherwise, we would have gotten an according error message. For example,
caretaker export --root=/home/path/to/my/ProjectHouse --dir=/home/path/of/another/place --pid=72returns the message
Trouble exporting project `72` under `/home/path/of/another/place`: Error: Problem reading the project with PID `72`:
Error: Unable to read the project: Error: There are 2 projects with a PID that starts with `72`, namely:
`72907124b28907efb45ce40a705c489755d1fe95`, `72f89bcf0edcb2e3b69274d69d62b930e8aa6c64`.
Now, as a result of the export call, the following file tree is created underneath the given dir:
/home/path/of/another/place/72f89bcf0edcb2e3b69274d69d62b930e8aa6c64/ new directory containing the whole export of this project./home/path/of/another/place/72f89bcf0edcb2e3b69274d69d62b930e8aa6c64/project.html a HTML file with the project description./home/path/of/another/place/72f89bcf0edcb2e3b69274d69d62b930e8aa6c64/project.json for the project description as a JSON object./home/path/of/another/place/72f89bcf0edcb2e3b69274d69d62b930e8aa6c64/home/ the active home directory and a copy of all its contents/home/path/of/another/place/72f89bcf0edcb2e3b69274d69d62b930e8aa6c64/1234..../ content of the first backup/home/path/of/another/place/72f89bcf0edcb2e3b69274d69d62b930e8aa6c64/2345..../ content of the second backup/home/path/of/another/place/72f89bcf0edcb2e3b69274d69d62b930e8aa6c64/3456..../ content of the third backupYou can also export all projects of a Project House by calling
caretaker export-all --root=ROOT --dir=DIR
where ROOT is the Project House root and DIR the target directory. For example,
caretaker export-all --root=/home/path/to/my/ProjectHouse --dir=/home/path/of/another/placeexports all the n projects of /home/path/to/my/ProjectHouse and creates the following file structure underneath the target /home/path/of/another/place
/home/path/of/another/place/ProjectHouseExport/ new directory containing the whole export/home/path/of/another/place/ProjectHouseExport/index.html an overview of all exported projects, similar to the archive of the project house/home/path/of/another/place/ProjectHouseExport/pid_1 a directory containing all content (project description, copy of the active home directory and all backups) of the first project with PID pid_1/home/path/of/another/place/ProjectHouseExport/pid_n a directory containing all content of the n-th projects.Note, that the export of an entire Project House usually requires much more storage space than the Project House itself, because now, there is a full copy of every file and every backup. When a file occurs unchanged in twenty backups, there are now twenty copies of that file in the export, whereas it was only stored once in the irredundant storage of the Project House.
There is also the option to export all projects with a certain tag attached or created by a particular person. The syntax of these two commands is
caretaker export --root=ROOT --dir=DIR --tag=STRINGor
caretaker export --root=ROOT --dir=DIR --creator=EMAILThe result is similar to output of the export-all command, except that now only the projects with the according tag or creator name are included.
Suppose, you have created and populated two Project Houses. Let there roots be /home/charly/testing/ProjectHouse and /home/charly/Homework/ProjectHouse, respectively. You can then import all projects from the first (import) into the second one (root) by calling
caretaker import-house --import=/home/charly/testing/ProjectHouse --root=/home/charly/Homework/ProjectHouseAll projects from the import Project House will then be copied into the root Project House, except the once that have been discarded into the trash. All active home directories will be copied, too.
When you have a look into the trash, you can see the list of all projects that have been discarded. It is possible to empty the trash and delete all these projects for good. Doing so is normally discouraged, because you lose the chance to recycle projects.
However, if you do like to empty the trash, for example because you would like to reduce the storage space for your Project House, there is an option to do so. But this is not a simple mouse click in the caretaker program anymore. For that, you need to go back to the command line:
Call
caretaker empty-trash --root=/home/buc/tmp/ProjectHousewhere you fill in the actual --root value for your own Project House.
Then you can start the server again by calling
caretaker start-server --root=/home/buc/tmp/ProjectHouse --port=55555where you, again, can choose your own root value and the port number you would like to use.
When you then visit the trash again, you should see an empty trash. All other projects in the archive and workshop remain unchanged. 5
The caretaker program managing a Project House is a system not for just one, but an arbitrary number of projects. And that opens up a whole range of new possibilities, because projects can be separated into many and combined into one. Projects can be used as building blocks for new projects.
Suppose, we are busy designing a series of websites for our firm and we always use a default design and pattern for every page. We can create a project for this default design and use that for many other projects. To be more precise, suppose this is the life version of this reusable project, which has the PID dea1..:

There is a template for HTML files template.html that uses an external CSS style sheet style.css, and integrates a corporate logo logo.jpg and favicon favicon.ico.
Now let us create another project for our firm, titled Newsletter November, where we apply this theme. There are different versions to do so.
Version 1
We create and activate a new project, copy all four files of the active home of the Default Website Theme project to the new active home directory, modify template.html with the new content and rename it as say Newsletter.html. The new project in the browser looks something like this:

Version 2 (cloning)
Another way to achive the same result is the clone: make sure you have made a of the active home directory of project dea1.., then choose to this most recent backup. That opens the cache:
and when you and click , the result is

You can then this cloned project and you see that copies have been created of all four files:
You can then change the template.html to Newsletter.html in the active home directory and the project description and change the title from [CLONE] Default Website Theme to Newsletter November.
Version 3 (with symbolic links)
This version starts similar to either version 1 or 2, so let us continue with what we got from there. Note, that three of the four files are still precise copies of files from dea1.. Default Website Theme. We now delete these three files and replace them by symbolic links6 to their originals in project dea1... The result in the browser looks like this:

In the display of the active home directory, symbolic links are displayed with an arrow ➯. For example,
favicon.ico ➯ /home/buc/tmp/ProjectHouse/dea16bdc694060842587bdd8016166e6ddd98c4f/favicon.icois saying that favicon.ico is a link name that refers to the target /home/buc/tmp/ProjectHouse/dea16bdc694060842587bdd8016166e6ddd98c4f/favicon.ico.
If we now choose to make a , each link is backed up as the target file it points to, wheras in the active home directory, the links remain.

The advantage of symbolic links over copies is that changing the target changes the links, too.
For example, suppose we make two changes to the Default Website Theme project: We update the content of the style.css file and we replace the old logo.jpg by the new-logo.jpg. The status of the Newsletter November project is this:
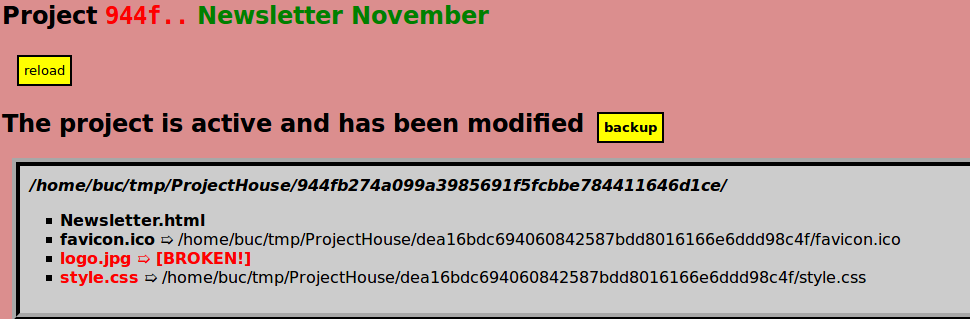
style.css and logo.jpg both have been updated in this project, too. However, the logo.jpg link is now broken, because that target is pointing to a removed, and thus no longer existing item. We can fix that by changing the link target, and the result is this:

If we now make a backup of the Newsletter November project, the new versions of the two files are saved in this backup.
By using symbolic links between projects, we make sure that an update of one project also updates the linked projects, too.
Strictly speaking, there must be clashes: there must be two or more different files with the same SHA-1 code, because we have only a finite amout of numbers available for an infinite amount of files. But there are 1640 different 40-digit hexadecimal numbers. In decimal notation, this number is 1461501637330902918203684832716283019655932542976, a number with 49 digits. That number is astronomically high and even if we apply the function many times, the risk to obtain two identical numbers for two different files is practically zero and may really be neglected.↩
You should also try to avoid the tilde ~ that servers as an alias for the users home directory on UNIX-like systems. It is not well-supported by Node, the underlying JavaScript machine that runs the Caretaker program.↩
The do value home in the query string makes the server produce the start page. Other options are say ?do=workshop to produce the workshop, ?do=archive to show the projects in the archive or ?do=displayProject&pid=e6b389a0c7d9da823dabc0b29e1824227df140f3 to display the project with PID number e6b3....↩
And each time you make a change, for example by clicking a button in the browser, the according action is echoed to the command line.↩
Stopping the server before emptying the trash is a safety feature, because the prodecure is a complex one. We cannot just delete the discarded projects and their files, because some of these files may also belong to projects that are still in the archive. Therefore, a clone of the entire storage system is made, containing all projects in the archive and all their files. And then the original storage is deleted and replaced by this clone.↩
A symbolic link links a link name to a target file or directory. The link name serves as an alias for the target and can be used like the target item.
In the terminal of UNIX-like systems, a symbolic link is created by
ln -s TARGET LINK_NAMEIn a Windows console, this is done by
mklink LINK_NAME TARGETfor links to files, and
mklink /d LINK_NAME TARGETfor a symbolic link to a directory.
You can also remove the symbolic link again, without removing the target. In UNIX-like system this is done with
rm LINK_NAMEMany file managers such as Linux Dolphin (or Windows File Explorer) also support the creation of symbolic links. Right-click on the directory where the link is supposed to exist

and choose the link name and target
